
沿着 URP 的 LitGBufferPass 阅读结构体、顶点与片元处理,梳理 SurfaceData、InputData、BRDFData 到 GBuffer 输出的过程。
篇幅问题这次只介绍Gbuffer的shader,下一篇是LightPass 众所周知,Unity的延迟光照主要由两个部分组成:GbufferPass,LightingPass,本文主要对这两个Pass的Shader进行一个梳理。(观前提示,由于Unity的渲染主要是基于PBR的,在读此篇文章前最好熟练掌握PBR,最好手动实现过相关代码,这样才知道我在讲什么)
1.GbufferPass
不论是延迟管线还是前向渲染,unity的材质都是写在LitShader下的,它其中包含多个Pass,从前到后分别是: - ForwardLit:负责前向渲染 - ShadowCaster:负责计算阴影、 - GBuffer:负责计算延迟渲染中各个Gbuffer - DepthOnly:深度 - DepthNormals:深度法线 - Meta:烘焙光照贴图 - Universal2D:2D渲染 其中重点要讲的是GbufferPass的结构:如图
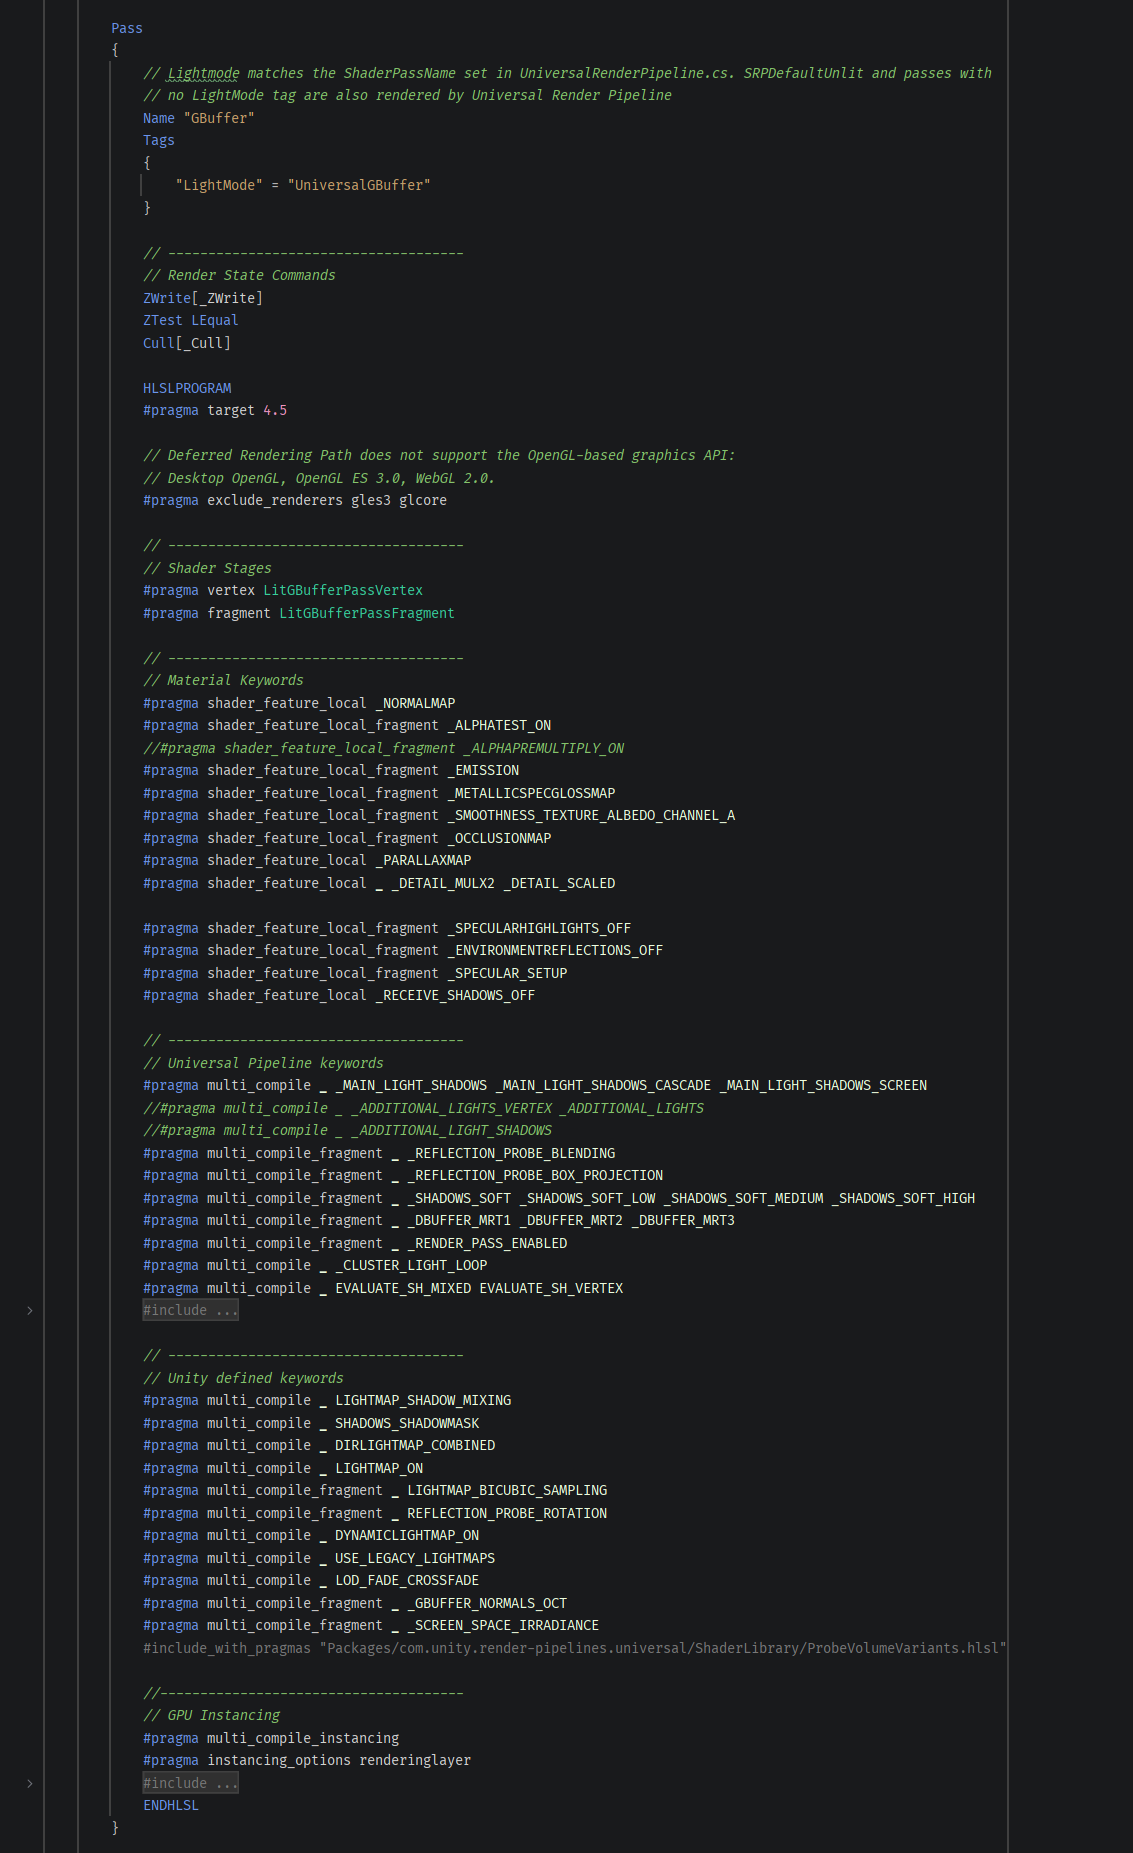
整个GbufferPass其实并不像我们熟知那样将整个shader分成俩结构体、与顶点片元着色器那样, 它通篇都在定义各种宏,用于各种情况的开关。实际上,关键的顶点和片元着色器部分写在了Packages/com.unity.render-pipelines.universal/Shaders/LitGBufferPass.hlsl中,此外,关于大部分变量的声明,都写在了Packages/com.unity.render-pipelines.universal/Shaders/LitInput.hlsl中。 然后来看LitGBufferPass.hlsl
1.1结构体
首先是第一个结构体:
struct Attributes
{
    float4 positionOS   : POSITION;
    float3 normalOS     : NORMAL;
    float4 tangentOS    : TANGENT;
    float2 texcoord     : TEXCOORD0;
    float2 staticLightmapUV   : TEXCOORD1;
    float2 dynamicLightmapUV  : TEXCOORD2;
    UNITY_VERTEX_INPUT_INSTANCE_ID
};
其中定义了延迟渲染中常用的顶点数据,其中UV1和UV2分别用于静态与动态的光照贴图。
struct Varyings
{
    float2 uv                       : TEXCOORD0;

#if defined(REQUIRES_WORLD_SPACE_POS_INTERPOLATOR)
    float3 positionWS               : TEXCOORD1;
#endif

    half3 normalWS                  : TEXCOORD2;
#if defined(REQUIRES_WORLD_SPACE_TANGENT_INTERPOLATOR)
    half4 tangentWS                 : TEXCOORD3;    // xyz: tangent, w: sign
#endif
#ifdef _ADDITIONAL_LIGHTS_VERTEX
    half3 vertexLighting            : TEXCOORD4;    // xyz: vertex lighting
#endif

#if defined(REQUIRES_VERTEX_SHADOW_COORD_INTERPOLATOR)
    float4 shadowCoord              : TEXCOORD5;
#endif

#if defined(REQUIRES_TANGENT_SPACE_VIEW_DIR_INTERPOLATOR)
    half3 viewDirTS                 : TEXCOORD6;
#endif

    DECLARE_LIGHTMAP_OR_SH(staticLightmapUV, vertexSH, 7);
#ifdef DYNAMICLIGHTMAP_ON
    float2  dynamicLightmapUV       : TEXCOORD8; // Dynamic lightmap UVs
#endif

#ifdef USE_APV_PROBE_OCCLUSION
    float4 probeOcclusion           : TEXCOORD9;
#endif

    float4 positionCS               : SV_POSITION;
    UNITY_VERTEX_INPUT_INSTANCE_ID
    UNITY_VERTEX_OUTPUT_STEREO};
第二个结构体实际上输出的数据也没什么复杂的地方,只不过有大量的宏参与。
1.2顶点着色器
// Used in Standard (Physically Based) shader
Varyings LitGBufferPassVertex(Attributes input)
{
    Varyings output = (Varyings)0;

    UNITY_SETUP_INSTANCE_ID(input);
    UNITY_TRANSFER_INSTANCE_ID(input, output);
    UNITY_INITIALIZE_VERTEX_OUTPUT_STEREO(output);

    VertexPositionInputs vertexInput = GetVertexPositionInputs(input.positionOS.xyz);

    // normalWS and tangentWS already normalize.
    // this is required to avoid skewing the direction during interpolation    // also required for per-vertex lighting and SH evaluation    VertexNormalInputs normalInput = GetVertexNormalInputs(input.normalOS, input.tangentOS);

    output.uv = TRANSFORM_TEX(input.texcoord, _BaseMap);

    // already normalized from normal transform to WS.
    output.normalWS = normalInput.normalWS;

    #if defined(REQUIRES_WORLD_SPACE_TANGENT_INTERPOLATOR) || defined(REQUIRES_TANGENT_SPACE_VIEW_DIR_INTERPOLATOR)
        real sign = input.tangentOS.w * GetOddNegativeScale();
        half4 tangentWS = half4(normalInput.tangentWS.xyz, sign);
    #endif

    #if defined(REQUIRES_WORLD_SPACE_TANGENT_INTERPOLATOR)
        output.tangentWS = tangentWS;
    #endif

    #if defined(REQUIRES_TANGENT_SPACE_VIEW_DIR_INTERPOLATOR)
        half3 viewDirWS = GetWorldSpaceNormalizeViewDir(vertexInput.positionWS);
        half3 viewDirTS = GetViewDirectionTangentSpace(tangentWS, output.normalWS, viewDirWS);
        output.viewDirTS = viewDirTS;
    #endif

    OUTPUT_LIGHTMAP_UV(input.staticLightmapUV, unity_LightmapST, output.staticLightmapUV);
#ifdef DYNAMICLIGHTMAP_ON
    output.dynamicLightmapUV = input.dynamicLightmapUV.xy * unity_DynamicLightmapST.xy + unity_DynamicLightmapST.zw;
#endif
    OUTPUT_SH4(vertexInput.positionWS, output.normalWS.xyz, GetWorldSpaceNormalizeViewDir(vertexInput.positionWS), output.vertexSH, output.probeOcclusion);

    #ifdef _ADDITIONAL_LIGHTS_VERTEX
        half3 vertexLight = VertexLighting(vertexInput.positionWS, normalInput.normalWS);
        output.vertexLighting = vertexLight;
    #endif

    #if defined(REQUIRES_WORLD_SPACE_POS_INTERPOLATOR)
        output.positionWS = vertexInput.positionWS;
    #endif

    #if defined(REQUIRES_VERTEX_SHADOW_COORD_INTERPOLATOR)
        output.shadowCoord = GetShadowCoord(vertexInput);
    #endif

    output.positionCS = vertexInput.positionCS;

    return output;
}
顶点着色器中含有了大量的宏变量,这里尽量每行都讲解一下。(这种事情现在其实直接问AI就好了吧)
Varyings output = (Varyings)0; 一般我们声明输出结构的时候直接Varyings output;这里为了防止由于有各种宏出现意外,先对它进行了初始化处理。
UNITY_SETUP_INSTANCE_ID(input);
UNITY_TRANSFER_INSTANCE_ID(input, output);
UNITY_INITIALIZE_VERTEX_OUTPUT_STEREO(output); 前两个是Instance
ID相关预处理,第三个是VR与XR相关关于左右眼的预处理
VertexPositionInputs vertexInput = GetVertexPositionInputs(input.positionOS.xyz); 声明一个顶点结构,通过GetVertexPositionInputs函数将各种常见的顶点变换输出到vertexInput中,GetVertexPositionInputs写在ShaderVariablesFunctions.hlsl中,具体函数如下:
VertexPositionInputs GetVertexPositionInputs(float3 positionOS)
{
    VertexPositionInputs input;
    input.positionWS = TransformObjectToWorld(positionOS);
    input.positionVS = TransformWorldToView(input.positionWS);
    input.positionCS = TransformWorldToHClip(input.positionWS);

    float4 ndc = input.positionCS * 0.5f;
    input.positionNDC.xy = float2(ndc.x, ndc.y * _ProjectionParams.x) + ndc.w;
    input.positionNDC.zw = input.positionCS.zw;

    return input;
}
可以看到它实际做的其实就是之前我们常常做的矩阵变换,准备了世界空间、视空间、裁剪空间顶点,只不过是这里给包装起来了而已。
VertexNormalInputs normalInput = GetVertexNormalInputs(input.normalOS, input.tangentOS); 与顶点类似,这里的normalInput就是法线相关数据,使用GetVertexNormalInputs函数填充,这个函数也记录在ShaderVariablesFunctions.hlsl中,具体函数实现如下:
VertexNormalInputs GetVertexNormalInputs(float3 normalOS, float4 tangentOS)
{
    VertexNormalInputs tbn;

    // mikkts space compliant. only normalize when extracting normal at frag.
    real sign = real(tangentOS.w) * GetOddNegativeScale();
    tbn.normalWS = TransformObjectToWorldNormal(normalOS);
    tbn.tangentWS = real3(TransformObjectToWorldDir(tangentOS.xyz));
    tbn.bitangentWS = real3(cross(tbn.normalWS, float3(tbn.tangentWS))) * sign;
    return tbn;
}
可以看到,其中包含世界空间的法线、切线、副切线数据,也是我们常见的变换矩阵。
output.uv = TRANSFORM_TEX(input.texcoord, _BaseMap);
// already normalized from normal transform to WS.
output.normalWS = normalInput.normalWS;
输出UV和世界空间法线,没什么好讲的
再往后一大段都是根据各种条件来准备数据,没什么特殊的处理方法,也没什么特殊处理的数据,这里先不详细讲了。
1.3片元着色器
unity把各种乱七八糟的算法都封装在各种乱七八糟的的函数里真是火大,一层又一层,像是剥洋葱一样,边剥边哭。
先看函数本身:GBufferFragOutput LitGBufferPassFragment(Varyings
input)
{}它输出的类型是一个名为GBufferFragOutput的结构体,被定义在GBufferOutput.hlsl中,实际上也就是我们熟知的各种GBuffer,但其实也不止,我们直接看GBufferFragOutput的定义:
// URP GBuffer pass fragment shader output struct.
struct GBufferFragOutput
{
    half4 gBuffer0 : SV_Target0;
    half4 gBuffer1 : SV_Target1;
    half4 gBuffer2 : SV_Target2;
    half4 color    : SV_Target3; // Camera color attachment, used for GI during GBuffer laydown

    #if defined(GBUFFER_FEATURE_DEPTH)
    DECL_OPT_GBUFFER_TARGET(float, depth, GBUFFER_IDX_R_DEPTH);
    #endif

    #if defined(GBUFFER_FEATURE_SHADOWMASK)
    DECL_OPT_GBUFFER_TARGET(half4, shadowMask, GBUFFER_IDX_RGBA_SHADOWMASK);
    #endif

    #if defined(GBUFFER_FEATURE_RENDERING_LAYERS)
    DECL_OPT_GBUFFER_TARGET(uint, meshRenderingLayers, GBUFFER_IDX_R_RENDERING_LAYERS);
    #endif
};
里面东西不多,还是有值得说道的,首先是unity对各个Gbuffer的起名啊,前仨还是各种Gbuffer第四个画风突变,起名叫Color,它实际上是储存环境光的缓冲区。他就很坑啊,如果有人改过unity的延迟渲染你就会发现,在lightPass阶段,明明你什么都没写,但却自动会在输出结果加上第四个Gbuffer。实际上它不是自动加了第四个Gbuffer,而是unity就把他作为了相机的颜色缓冲的输出,所以它不叫什么Gbuffer3,而是叫Color,如果你看他的渲染目标,是这样:
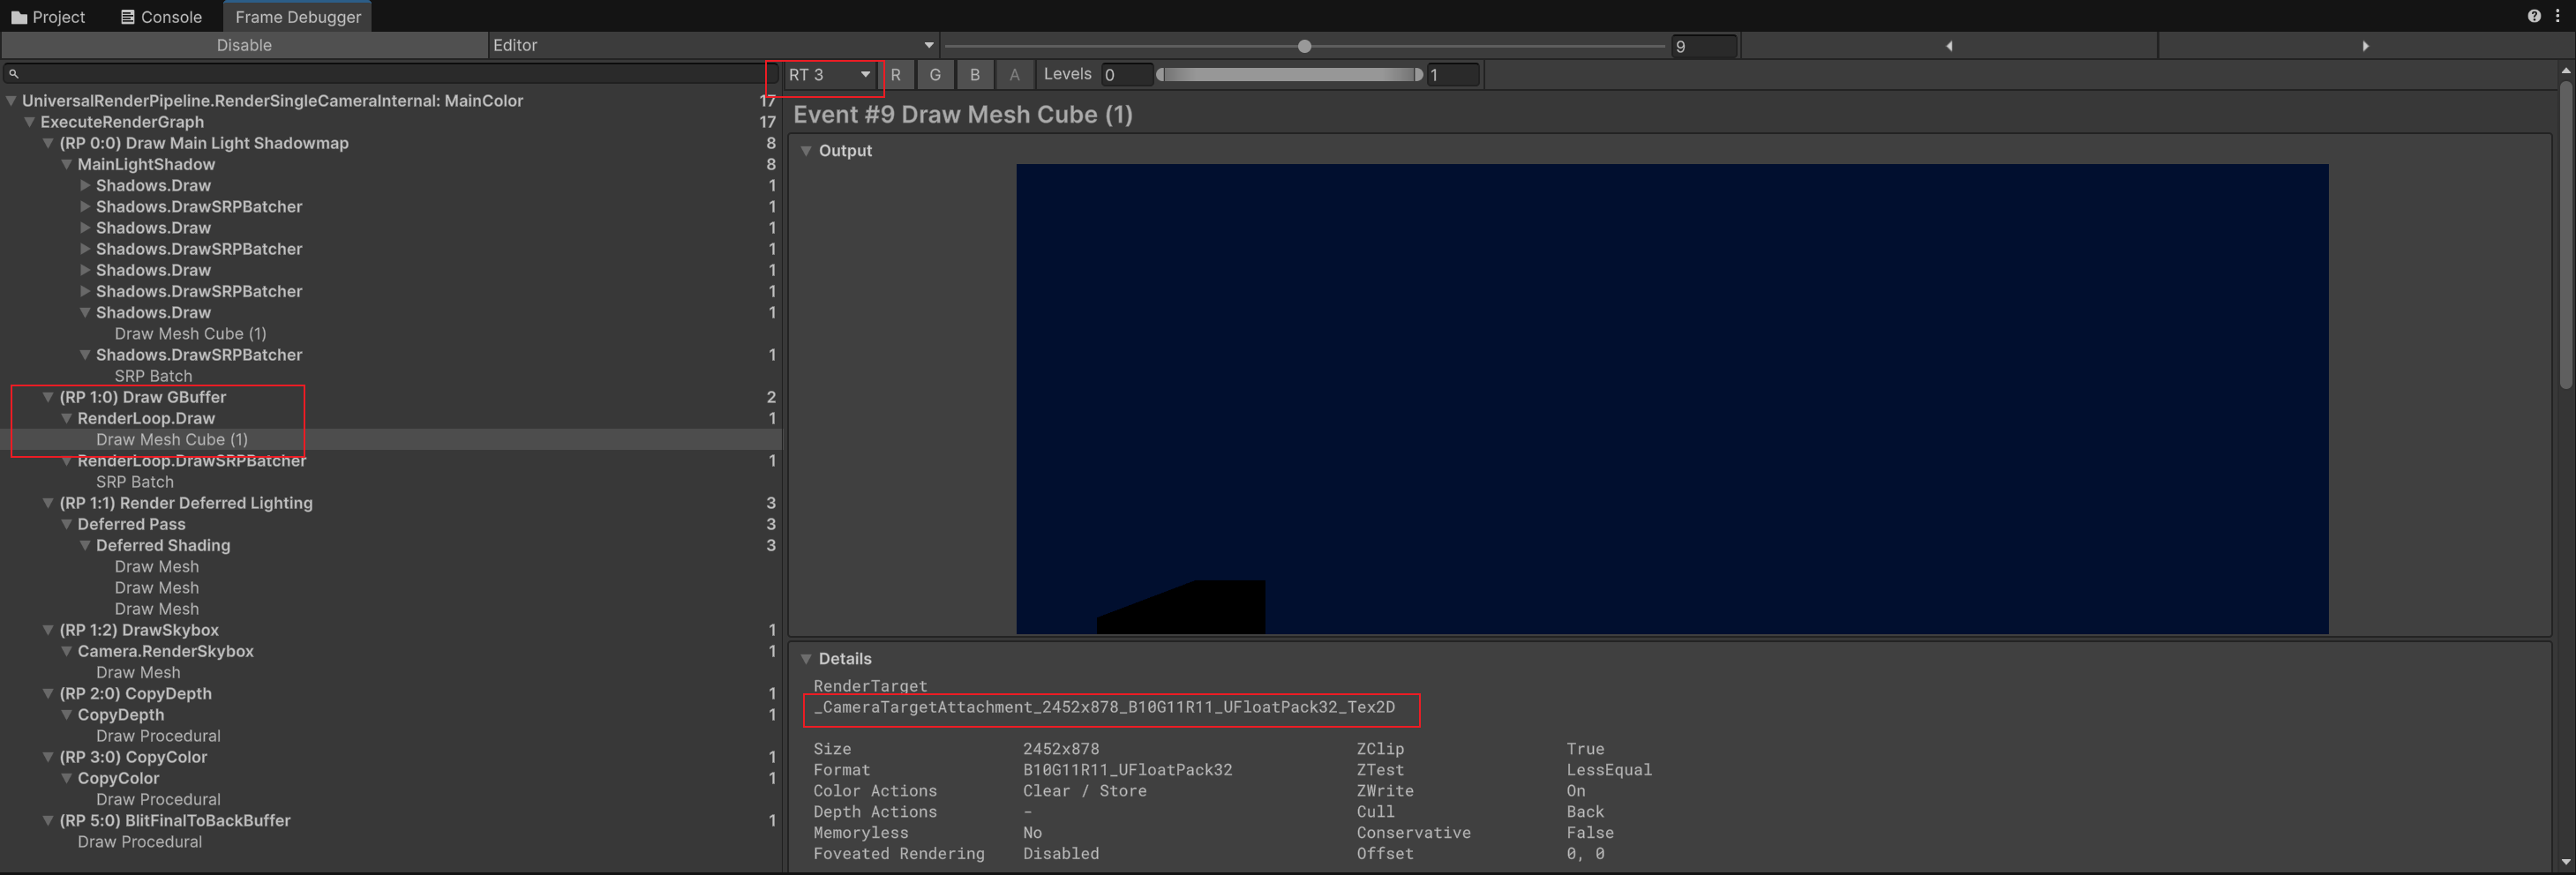
它实际上是_CameraTargetAttachment。 而其他Gbuffer是这个:
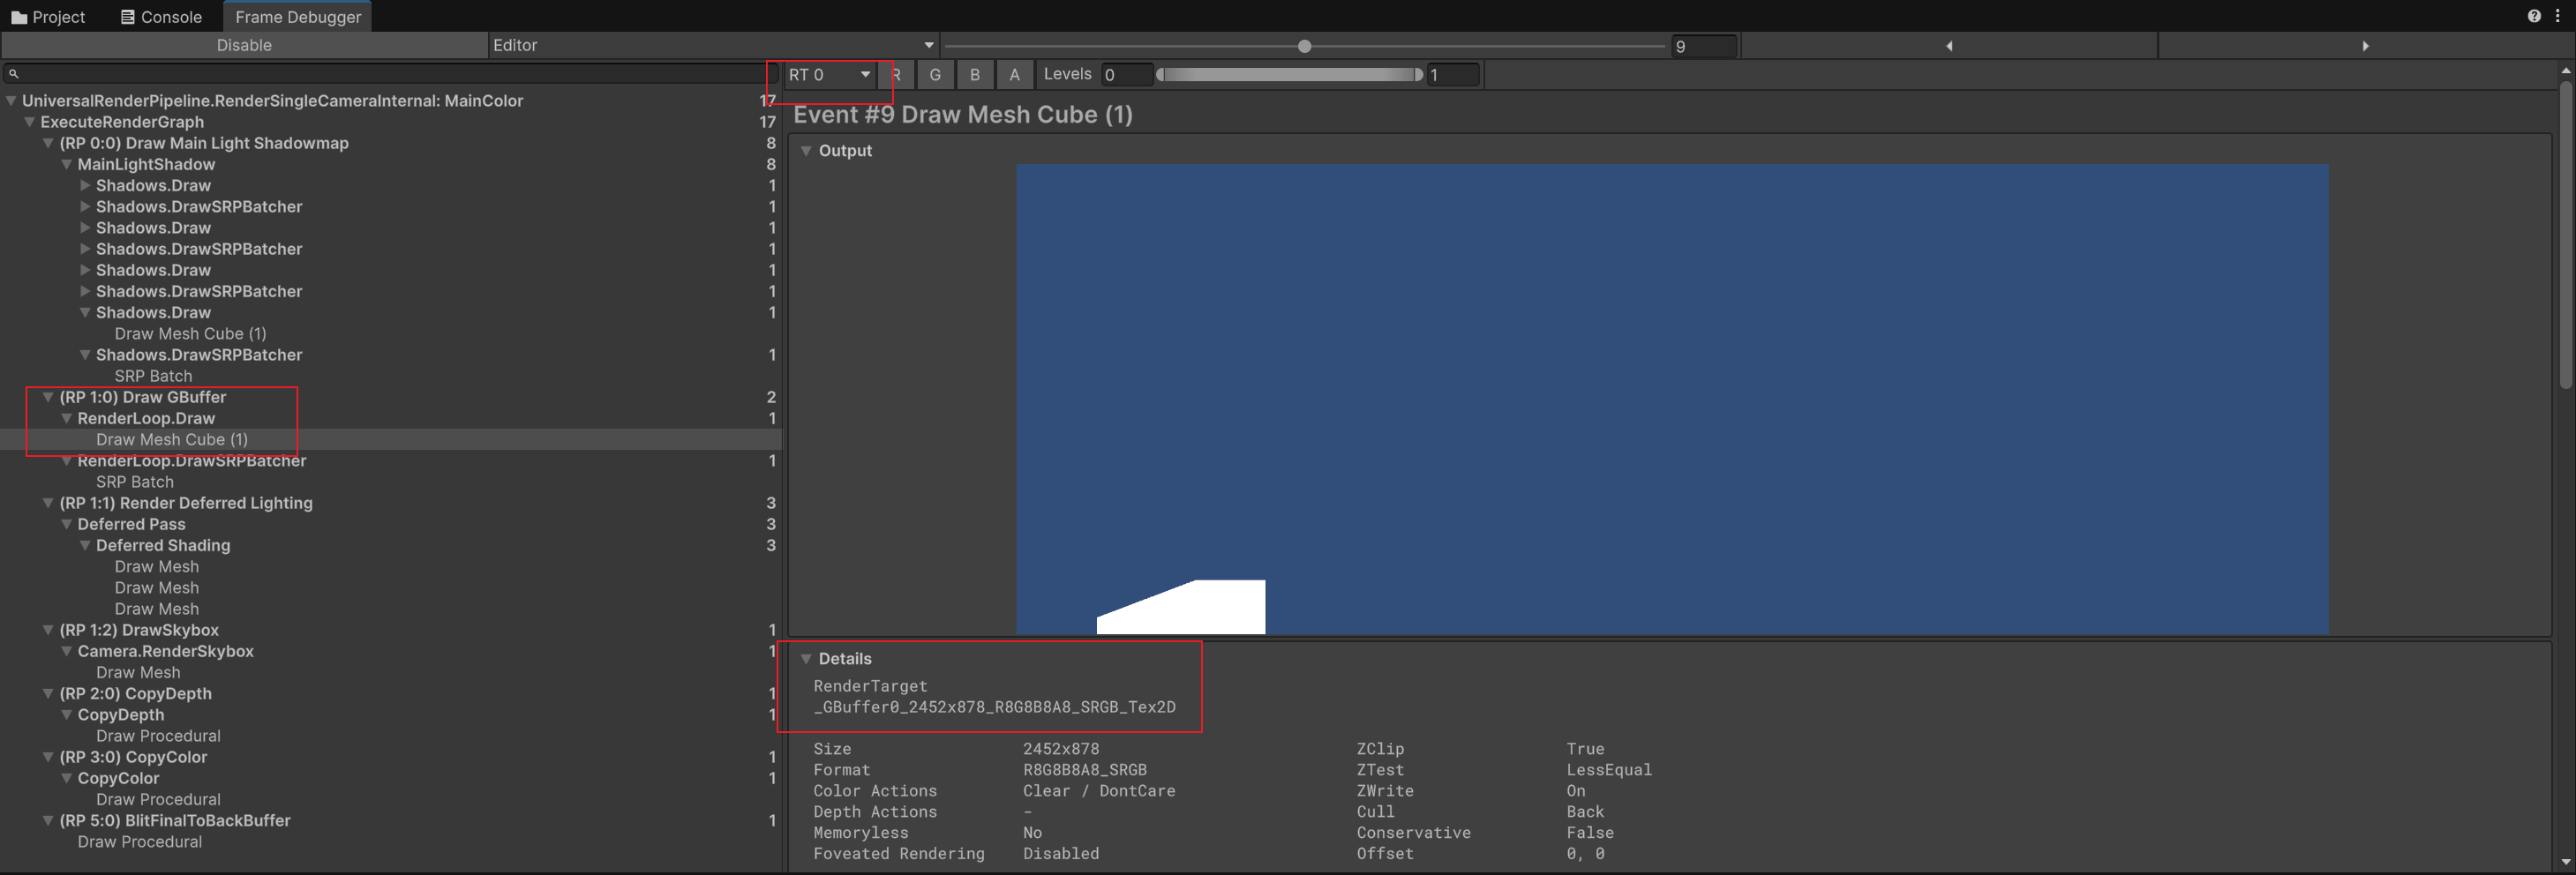
Gbuffer0!这才是Gbuffer该有的名称嘛。 我们再看光照Pass的渲染目标:
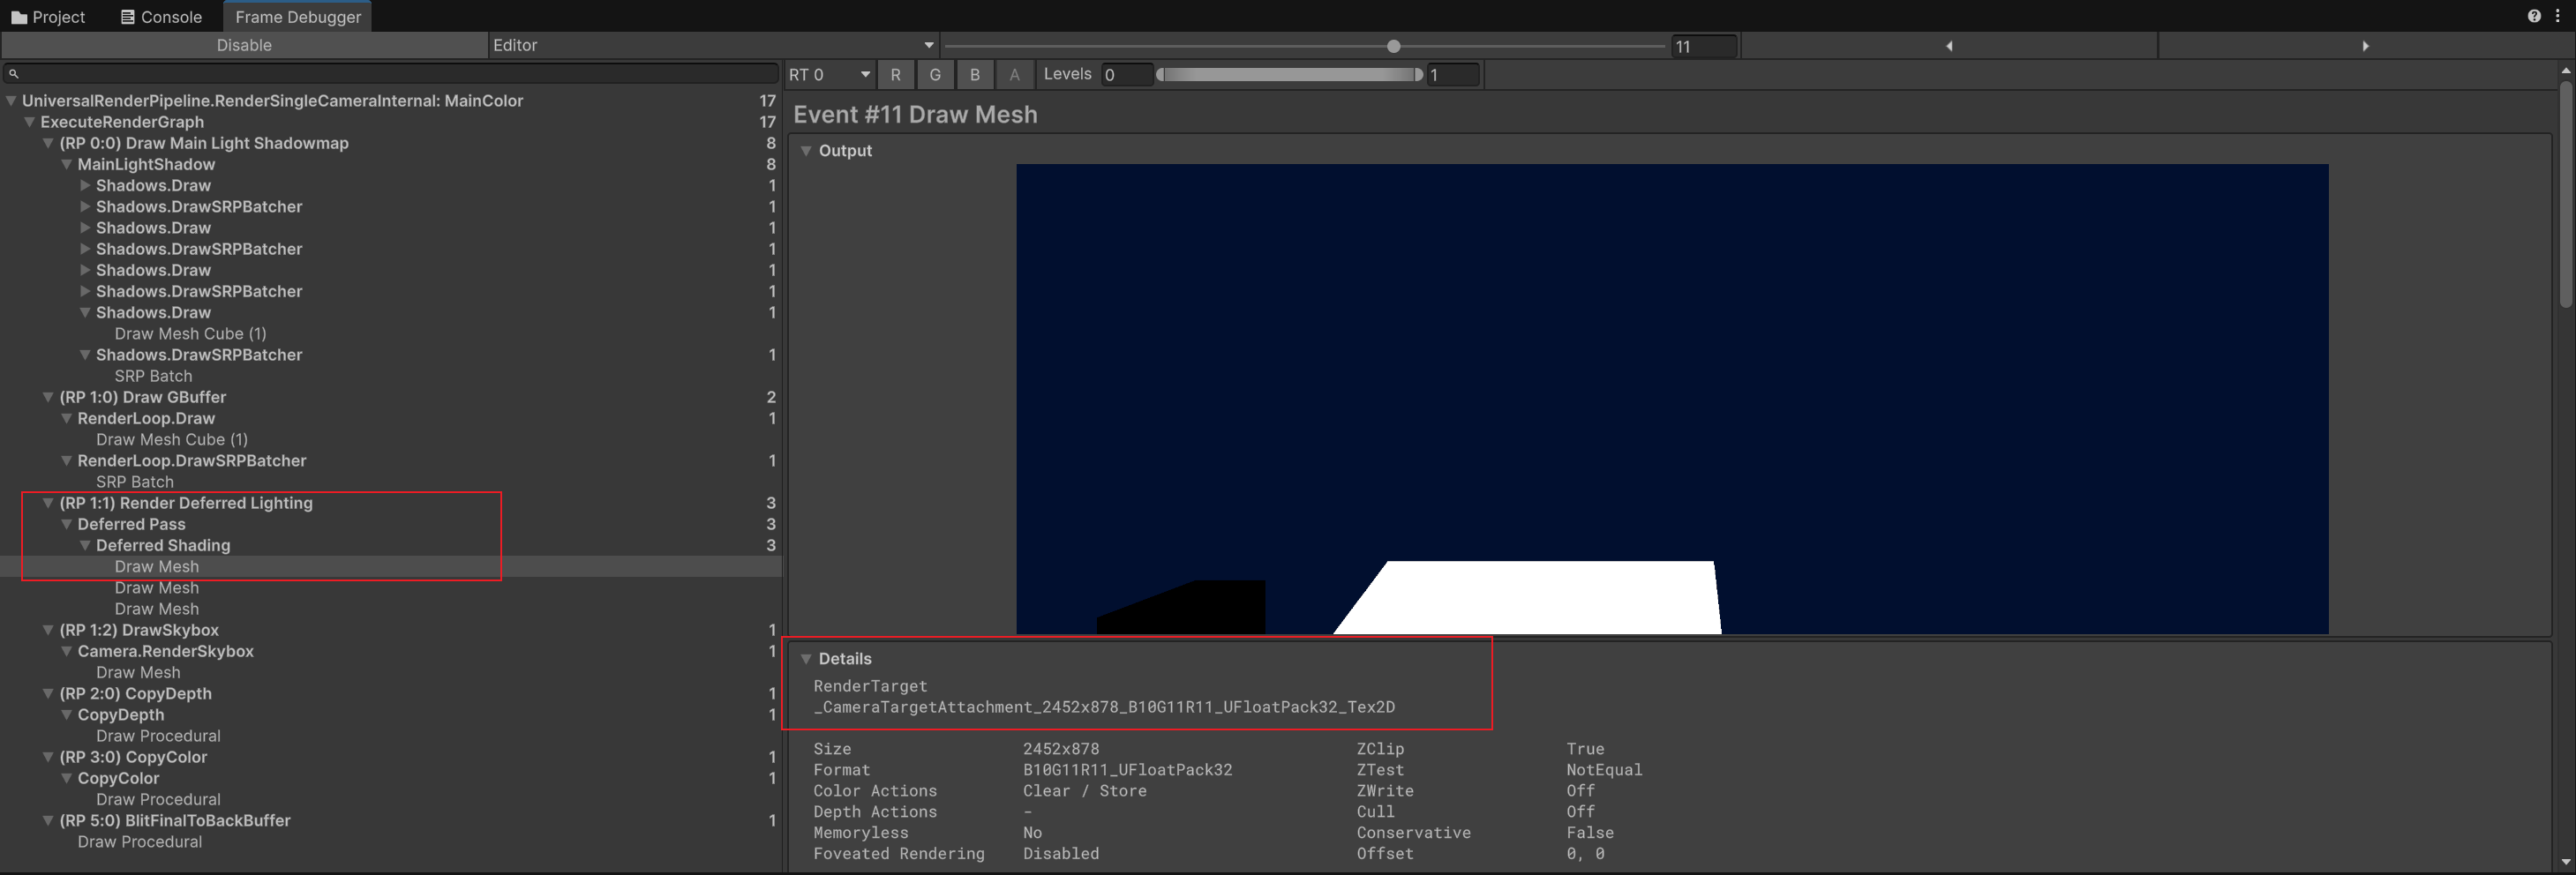
破案了,连个Clear都没有,它就是直接把Gbuffer4当作相机的渲染目标的,所以后面LightPass也再这上面着色,透明度混合Add,当然就自动将环境光自动加上去了。 再之后是下面的各种宏:GBufferFragOutput不止输出4个Gbuffer,还有深度、阴影贴图、meshRenderingLayers。如果想要自己写延迟渲染的话,别忘了输出这些Gbuffer以外的东西。
整个片元着色器主要分为三大数据: 1. SurfaceData:主要是对材质面板上的数据进行统合 2. InputData:主要对各种计算用的中间数据 3. BRDFData:主要是BRDF所使用的专用的数据
UNITY_SETUP_INSTANCE_ID(input);
UNITY_SETUP_STEREO_EYE_INDEX_POST_VERTEX(input);
又是关于GPU实例化和VR的宏,不做详细说明。
#if defined(_PARALLAXMAP)
    #if defined(REQUIRES_TANGENT_SPACE_VIEW_DIR_INTERPOLATOR)
        half3 viewDirTS = input.viewDirTS;
    #else
        half3 viewDirWS = GetWorldSpaceNormalizeViewDir(input.positionWS);
        half3 viewDirTS = GetViewDirectionTangentSpace(input.tangentWS, input.normalWS, viewDirWS);
    #endif
    ApplyPerPixelDisplacement(viewDirTS, input.uv);
#endif
视差相关参数的声明,ApplyPerPixelDisplacement函数在LitInput.hlsl中,实现方式如下:
void ApplyPerPixelDisplacement(half3 viewDirTS, inout float2 uv)
{
#if defined(_PARALLAXMAP)
    uv += ParallaxMapping(TEXTURE2D_ARGS(_ParallaxMap, sampler_ParallaxMap), viewDirTS, _Parallax, uv);
#endif
}
总是是对视差的实现。
SurfaceData surfaceData;
InitializeStandardLitSurfaceData(input.uv, surfaceData);
surfaceData是材质面板中可调节的一些相关的数据,具体如下:
struct SurfaceData
{
    half3 albedo;
    half3 specular;
    half  metallic;
    half  smoothness;
    half3 normalTS;
    half3 emission;
    half  occlusion;
    half  alpha;
    half  clearCoatMask;
    half  clearCoatSmoothness;
};
而后面的InitializeStandardLitSurfaceData函数则填充这个结构体,实际上做的事情就是将材质面板中的数据进行统合,InitializeStandardLitSurfaceData实现方法如下:
inline void InitializeStandardLitSurfaceData(float2 uv, out SurfaceData outSurfaceData)
{
    half4 albedoAlpha = SampleAlbedoAlpha(uv, TEXTURE2D_ARGS(_BaseMap, sampler_BaseMap));
    outSurfaceData.alpha = Alpha(albedoAlpha.a, _BaseColor, _Cutoff);

    half4 specGloss = SampleMetallicSpecGloss(uv, albedoAlpha.a);
    outSurfaceData.albedo = albedoAlpha.rgb * _BaseColor.rgb;
    outSurfaceData.albedo = AlphaModulate(outSurfaceData.albedo, outSurfaceData.alpha);

#if _SPECULAR_SETUP
    outSurfaceData.metallic = half(1.0);
    outSurfaceData.specular = specGloss.rgb;
#else
    outSurfaceData.metallic = specGloss.r;
    outSurfaceData.specular = half3(0.0, 0.0, 0.0);
#endif

    outSurfaceData.smoothness = specGloss.a;
    outSurfaceData.normalTS = SampleNormal(uv, TEXTURE2D_ARGS(_BumpMap, sampler_BumpMap), _BumpScale);
    outSurfaceData.occlusion = SampleOcclusion(uv);
    outSurfaceData.emission = SampleEmission(uv, _EmissionColor.rgb, TEXTURE2D_ARGS(_EmissionMap, sampler_EmissionMap));

#if defined(_CLEARCOAT) || defined(_CLEARCOATMAP)
    half2 clearCoat = SampleClearCoat(uv);
    outSurfaceData.clearCoatMask       = clearCoat.r;
    outSurfaceData.clearCoatSmoothness = clearCoat.g;
#else
    outSurfaceData.clearCoatMask       = half(0.0);
    outSurfaceData.clearCoatSmoothness = half(0.0);
#endif

#if defined(_DETAIL)
    half detailMask = SAMPLE_TEXTURE2D(_DetailMask, sampler_DetailMask, uv).a;
    float2 detailUv = uv * _DetailAlbedoMap_ST.xy + _DetailAlbedoMap_ST.zw;
    outSurfaceData.albedo = ApplyDetailAlbedo(detailUv, outSurfaceData.albedo, detailMask);
    outSurfaceData.normalTS = ApplyDetailNormal(detailUv, outSurfaceData.normalTS, detailMask);
#endif
}
#ifdef LOD_FADE_CROSSFADE
LODFadeCrossFade(input.positionCS);
#endifLOD的淡入淡出,防止LOD切换时模型的跳变。
InputData inputData;
InitializeInputData(input, surfaceData.normalTS, inputData);
SETUP_DEBUG_TEXTURE_DATA(inputData, UNDO_TRANSFORM_TEX(input.uv, _BaseMap));
inputData结构体中是后续渲染流程所需的各种中间变量用于后面各种数据的计算,再用InitializeInputData函数进行填充,最后一行莫名其妙的东西是用来Debug的,不会走入正常的渲染流程。 先看结构体:
struct InputData
{
    float3  positionWS;
    float4  positionCS;
    float3  normalWS;
    half3   viewDirectionWS;
    float4  shadowCoord;
    half    fogCoord;
    half3   vertexLighting;
    half3   bakedGI;
    float2  normalizedScreenSpaceUV;
    half4   shadowMask;
    half3x3 tangentToWorld;

#if defined(DEBUG_DISPLAY)
    half2   dynamicLightmapUV;
    half2   staticLightmapUV;
    float3  vertexSH;

    half3 brdfDiffuse;
    half3 brdfSpecular;

    // Mipmap Streaming Debug
    float2 uv;
    uint mipCount;

    // texelSize :
    // x = 1 / width    // y = 1 / height    // z = width    // w = height    float4 texelSize;

    // mipInfo :
    // x = quality settings minStreamingMipLevel    // y = original mip count for texture    // z = desired on screen mip level    // w = loaded mip level    float4 mipInfo;

    // streamInfo :
    // x = streaming priority    // y = time stamp of the latest texture upload    // z = streaming status    // w = 0    float4 streamInfo;

    float3 originalColor;

    float4 probeOcclusion;
#endif
};
可以说拥有PBR所需要的绝大多数数据了。然后就是在InitializeInputData中填充这些数据:
void InitializeInputData(Varyings input, half3 normalTS, out InputData inputData)
{
    inputData = (InputData)0;

    #if defined(REQUIRES_WORLD_SPACE_POS_INTERPOLATOR)
        inputData.positionWS = input.positionWS;
    #endif

    inputData.positionCS = input.positionCS;
    half3 viewDirWS = GetWorldSpaceNormalizeViewDir(input.positionWS);
    #if defined(_NORMALMAP) || defined(_DETAIL)
        float sgn = input.tangentWS.w;      // should be either +1 or -1
        float3 bitangent = sgn * cross(input.normalWS.xyz, input.tangentWS.xyz);
        inputData.normalWS = TransformTangentToWorld(normalTS, half3x3(input.tangentWS.xyz, bitangent.xyz, input.normalWS.xyz));
    #else
        inputData.normalWS = input.normalWS;
    #endif

    inputData.normalWS = NormalizeNormalPerPixel(inputData.normalWS);
    inputData.viewDirectionWS = viewDirWS;

    #if defined(REQUIRES_VERTEX_SHADOW_COORD_INTERPOLATOR)
        inputData.shadowCoord = input.shadowCoord;
    #elif defined(MAIN_LIGHT_CALCULATE_SHADOWS)
        inputData.shadowCoord = TransformWorldToShadowCoord(inputData.positionWS);
    #else
        inputData.shadowCoord = float4(0, 0, 0, 0);
    #endif

    inputData.fogCoord = 0.0; // we don't apply fog in the guffer pass

    #ifdef _ADDITIONAL_LIGHTS_VERTEX
        inputData.vertexLighting = input.vertexLighting.xyz;
    #else
        inputData.vertexLighting = half3(0, 0, 0);
    #endif

    inputData.normalizedScreenSpaceUV = GetNormalizedScreenSpaceUV(input.positionCS);
}
#if defined(_DBUFFER)
ApplyDecalToSurfaceData(input.positionCS, surfaceData, inputData);
#endif贴花
InitializeBakedGIData(input, inputData); 主要是采样各种烘焙GI以及阴影Mask,GI这部分主要是球谐函数来采样环境光的漫反射并储存到bakedGI里。 直接给代码:
void InitializeBakedGIData(Varyings input, inout InputData inputData)
{
#if defined(_SCREEN_SPACE_IRRADIANCE)
    inputData.bakedGI = SAMPLE_GI(_ScreenSpaceIrradiance, input.positionCS.xy);
#elif defined(DYNAMICLIGHTMAP_ON)
    inputData.bakedGI = SAMPLE_GI(input.staticLightmapUV, input.dynamicLightmapUV, input.vertexSH, inputData.normalWS);
    inputData.shadowMask = SAMPLE_SHADOWMASK(input.staticLightmapUV);
#elif !defined(LIGHTMAP_ON) && (defined(PROBE_VOLUMES_L1) || defined(PROBE_VOLUMES_L2))
    inputData.bakedGI = SAMPLE_GI(input.vertexSH,
        GetAbsolutePositionWS(inputData.positionWS),
        inputData.normalWS,
        inputData.viewDirectionWS,
        inputData.positionCS.xy,
        input.probeOcclusion,
        inputData.shadowMask);
#else
    inputData.bakedGI = SAMPLE_GI(input.staticLightmapUV, input.vertexSH, inputData.normalWS);
    inputData.shadowMask = SAMPLE_SHADOWMASK(input.staticLightmapUV);
#endif
}
BRDFData brdfData;
InitializeBRDFData(surfaceData.albedo, surfaceData.metallic, surfaceData.specular, surfaceData.smoothness, surfaceData.alpha, brdfData);BRDF所用的数据,了解BRDF的肯定对他们不陌生,陌生的建议先去过一遍BRDF,这里不详细讲了,先给个BRDFData:
struct BRDFData
{
    half3 albedo;
    half3 diffuse;
    half3 specular;
    half reflectivity;
    half perceptualRoughness;
    half roughness;
    half roughness2;
    half grazingTerm;

    // We save some light invariant BRDF terms so we don't have to recompute
    // them in the light loop. Take a look at DirectBRDF function for detailed explaination.    half normalizationTerm;     // roughness * 4.0 + 2.0
    half roughness2MinusOne;    // roughness^2 - 1.0
};
然后是InitializeBRDFData:
// Initialize BRDFData for material, managing both specular and metallic setup using shader keyword _SPECULAR_SETUP.
inline void InitializeBRDFData(half3 albedo, half metallic, half3 specular, half smoothness, inout half alpha, out BRDFData outBRDFData)
{
#ifdef _SPECULAR_SETUP
    half reflectivity = ReflectivitySpecular(specular);
    half oneMinusReflectivity = half(1.0) - reflectivity;
    half3 brdfDiffuse = albedo * oneMinusReflectivity;
    half3 brdfSpecular = specular;
#else
    half oneMinusReflectivity = OneMinusReflectivityMetallic(metallic);
    half reflectivity = half(1.0) - oneMinusReflectivity;
    half3 brdfDiffuse = albedo * oneMinusReflectivity;
    half3 brdfSpecular = lerp(kDielectricSpec.rgb, albedo, metallic);
#endif

    InitializeBRDFDataDirect(albedo, brdfDiffuse, brdfSpecular, reflectivity, oneMinusReflectivity, smoothness, alpha, outBRDFData);
}
Light mainLight = GetMainLight(inputData.shadowCoord, inputData.positionWS, inputData.shadowMask);
MixRealtimeAndBakedGI(mainLight, inputData.normalWS, inputData.bakedGI, inputData.shadowMask);获取主光源数据,然后对光照烘焙进行计算整理
half3 color = GlobalIllumination(brdfData, (BRDFData)0, 0,
                                          inputData.bakedGI, surfaceData.occlusion, inputData.positionWS,
                                          inputData.normalWS, inputData.viewDirectionWS, inputData.normalizedScreenSpaceUV);
这里的Color其实指的是间接光照,也就是后面要传入到第四个Gbuffer的部分,延迟渲染的直接光照主要是在后面的光照Pass阶段计算,所以前面都只是对各种数据的整理,但是间接光照部分就是在Gbuffer阶段计算的。 深入GlobalIllumination函数,可以看到关于间接光照的具体计算:
half3 GlobalIllumination(BRDFData brdfData, BRDFData brdfDataClearCoat, float clearCoatMask,
    half3 bakedGI, half occlusion, float3 positionWS,
    half3 normalWS, half3 viewDirectionWS, float2 normalizedScreenSpaceUV)
{
    half3 reflectVector = reflect(-viewDirectionWS, normalWS);
    half NoV = saturate(dot(normalWS, viewDirectionWS));
    half fresnelTerm = Pow4(1.0 - NoV);

    half3 indirectDiffuse = bakedGI;
    half3 indirectSpecular = GlossyEnvironmentReflection(reflectVector, positionWS, brdfData.perceptualRoughness, 1.0h, normalizedScreenSpaceUV);

    half3 color = EnvironmentBRDF(brdfData, indirectDiffuse, indirectSpecular, fresnelTerm);

    if (IsOnlyAOLightingFeatureEnabled())
    {        color = half3(1,1,1); // "Base white" for AO debug lighting mode
    }

#if defined(_CLEARCOAT) || defined(_CLEARCOATMAP)
    half3 coatIndirectSpecular = GlossyEnvironmentReflection(reflectVector, positionWS, brdfDataClearCoat.perceptualRoughness, 1.0h, normalizedScreenSpaceUV);
    // TODO: "grazing term" causes problems on full roughness
    half3 coatColor = EnvironmentBRDFClearCoat(brdfDataClearCoat, clearCoatMask, coatIndirectSpecular, fresnelTerm);

    // Blend with base layer using khronos glTF recommended way using NoV
    // Smooth surface & "ambiguous" lighting    // NOTE: fresnelTerm (above) is pow4 instead of pow5, but should be ok as blend weight.    half coatFresnel = kDielectricSpec.x + kDielectricSpec.a * fresnelTerm;
    return (color * (1.0 - coatFresnel * clearCoatMask) + coatColor) * occlusion;
#else
    return color * occlusion;
#endif
}
前面准备数据,例如反射方向,NoV,这些都是为了后续关于环境光镜面反射的采样和计算。 首先是间接光照的漫反射,可以看到half3 indirectDiffuse = bakedGI;是直接赋值之前已经采样好的bakedGI。 镜面反射主要来自于GlossyEnvironmentReflection函数,函数实现如下:
half3 GlossyEnvironmentReflection(half3 reflectVector, float3 positionWS, half perceptualRoughness, half occlusion, float2 normalizedScreenSpaceUV)
{
    half3 irradiance;

#if !defined(_ENVIRONMENTREFLECTIONS_OFF)
    if (_REFLECTION_PROBE_BLENDING)
    {
        irradiance = CalculateIrradianceFromReflectionProbes(reflectVector, positionWS, perceptualRoughness, normalizedScreenSpaceUV);    }    else    {
        if (_REFLECTION_PROBE_BOX_PROJECTION)
        {
            #if defined(REFLECTION_PROBE_ROTATION)            float3 probeCenterPosWS0 = unity_SpecCube0_BoxMin.xyz + (unity_SpecCube0_BoxMax.xyz - unity_SpecCube0_BoxMin.xyz) / 2;            float3 rotPosWS0 = RotateVectorByQuat(unity_SpecCube0_Rotation, positionWS - probeCenterPosWS0) + probeCenterPosWS0;            half3 rotReflectVector0 = RotateVectorByQuat(unity_SpecCube0_Rotation, reflectVector);            float4 inverseRotation0 = -unity_SpecCube0_Rotation;            inverseRotation0.w = -inverseRotation0.w;            reflectVector = BoxProjectedCubemapDirection(rotReflectVector0, rotPosWS0, unity_SpecCube0_ProbePosition, unity_SpecCube0_BoxMin, unity_SpecCube0_BoxMax);            reflectVector = RotateVectorByQuat(inverseRotation0, reflectVector);            #else            reflectVector = BoxProjectedCubemapDirection(reflectVector, positionWS, unity_SpecCube0_ProbePosition, unity_SpecCube0_BoxMin, unity_SpecCube0_BoxMax);            #endif        }        half mip = PerceptualRoughnessToMipmapLevel(perceptualRoughness);
        half4 encodedIrradiance = half4(SAMPLE_TEXTURECUBE_LOD(unity_SpecCube0, samplerunity_SpecCube0, reflectVector, mip));

        irradiance = DecodeHDREnvironment(encodedIrradiance, unity_SpecCube0_HDR);
    }#else // _ENVIRONMENTREFLECTIONS_OFF
    irradiance = _GlossyEnvironmentColor.rgb;
#endif // !_ENVIRONMENTREFLECTIONS_OFF

    return irradiance * occlusion;
}
粗浅的理解的话,其实就是根据反射方向采样CubeMap,然后根据粗糙度等级使用不同的Mip。
然后就是half3 color = EnvironmentBRDF(brdfData, indirectDiffuse, indirectSpecular, fresnelTerm); 实际上就是在混合漫反射和镜面反射,相关实现如下:
half3 EnvironmentBRDF(BRDFData brdfData, half3 indirectDiffuse, half3 indirectSpecular, half fresnelTerm)
{
    half3 c = indirectDiffuse * brdfData.diffuse;
    c += indirectSpecular * EnvironmentBRDFSpecular(brdfData, fresnelTerm);
    return c;
}
也就是环境光的漫反射和镜面反射之后,就是根据菲涅尔项,以不同比例来混合他们两个,得到最终的环境光项。
最后就是输出:PackGBuffersBRDFData(brdfData, inputData, surfaceData.smoothness, surfaceData.emission + color, surfaceData.occlusion); 还是先看相关函数实现吧:
GBufferFragOutput PackGBuffersBRDFData(BRDFData brdfData, InputData inputData, half smoothness, half3 globalIllumination, half occlusion = 1.0)
{
    half3 packedNormalWS = PackGBufferNormal(inputData.normalWS);

    uint materialFlags = 0;

    #ifdef _RECEIVE_SHADOWS_OFF
    materialFlags |= kMaterialFlagReceiveShadowsOff;
    #endif

    half3 packedSpecular;

    #ifdef _SPECULAR_SETUP
    materialFlags |= kMaterialFlagSpecularSetup;
    packedSpecular = brdfData.specular.rgb;
    #else
    packedSpecular.r = brdfData.reflectivity;
    packedSpecular.gb = 0.0;
    #endif

    #ifdef _SPECULARHIGHLIGHTS_OFF    // During the next deferred shading pass, we don't use a shader variant to disable specular calculations.
    // Instead, we can either silence specular contribution when writing the gbuffer, and/or reserve a bit in the gbuffer    // and use this during shading to skip computations via dynamic branching. Fastest option depends on platforms.    materialFlags |= kMaterialFlagSpecularHighlightsOff;
    packedSpecular = 0.0.xxx;
    #endif

    #if defined(LIGHTMAP_ON) && defined(_MIXED_LIGHTING_SUBTRACTIVE)
    materialFlags |= kMaterialFlagSubtractiveMixedLighting;
    #endif

    GBufferFragOutput output;
    output.gBuffer0 = half4(brdfData.albedo.rgb, PackGBufferMaterialFlags(materialFlags));  // diffuse           diffuse         diffuse         materialFlags   (sRGB rendertarget)
    output.gBuffer1 = half4(packedSpecular, occlusion);                                     // metallic/specular specular        specular        occlusion
    output.gBuffer2 = half4(packedNormalWS, smoothness);                                    // encoded-normal    encoded-normal  encoded-normal  smoothness
    output.color = half4(globalIllumination,1);                                            // GI                GI              GI              unused          (lighting buffer)

    #if defined(GBUFFER_FEATURE_DEPTH)
    output.depth = inputData.positionCS.z;
    #endif

    #if defined(GBUFFER_FEATURE_SHADOWMASK)
    output.shadowMask = inputData.shadowMask; // will have unity_ProbesOcclusion value if subtractive lighting is used (baked)
    #endif

    #if defined(GBUFFER_FEATURE_RENDERING_LAYERS)
    output.meshRenderingLayers = EncodeMeshRenderingLayer();
    #endif

    return output;
}
这个函数输出类型就是个GBufferFragOutput结构体,它干的事情就是把之前总结的种种数据塞入Gbuffer,Gbuffer阶段不做环境光以外的光照计算,所以你看这个shader通篇下来其实就是在进行各种数据传递,虽然Unity官方注释也写了到底传递的什么数据,不过这里再重新介绍一下吧: - Gbuffer0 :RGB:diffuse,也就是模型的基础色。A:materialFlags - Gbuffer1 : A:AO。RGB则分为两种情况,金属度流程时R通道为金属度,GB没用,高光流程中RGB为高光。 - Gbuffer2 : RGB:法线,勾选高精度法线的时候法线会变为八面体映射的形式。A:光滑度 - Gbuffer4:变量中写作Color,如前文所说,是环境光,A通道没用 除了各个Buffer实际上还会输出depth,shadowMask,meshRenderingLayers,如果是自己写GbufferShader的时候记得别忘了这些输出。
至此Gbuffer阶段完成,这次总结还算是比较简略,后续应该会逐渐的补充让他更加的完整。